Skip to content

Table of Contents
Why Might You Need to Reset Your Garage Door Opener?
There are several reasons why you might need to know how to reset garage door opener. Sometimes, your garage door opener might stop working properly, refusing to open or close your garage door. In other cases, it could be functioning erratically, with the garage door opening and closing at unexpected times.
Alternatively, if you’ve recently experienced a power outage, your garage door opener might have been affected, causing it to lose its settings and codes. Resetting your garage door opener can help restore its normal operation in such instances.
Another common reason for needing to reset a garage door opener is when you want to change your access code. This is especially crucial if you think that your existing code might have been compromised. By resetting your garage door opener and setting a new code, you can maintain your home’s security.
General Steps to Resetting a Garage Door Opener
Before we delve into the specific steps for resetting different brands of garage door openers, let’s take a look at the general steps involved. While there may be slight variations from one brand to another, the basic process typically involves the following steps:
- Locate the “Learn” or “Program” button on your garage door opener.
- Press and hold this button until the LED indicator light goes out or stops flashing. This usually takes about 6 seconds.
- After the LED light goes out, release the button. At this point, your garage door opener’s memory should be cleared, and all previous codes should be erased.
- To reprogram your garage door opener, press and release the “Learn” or “Program” button again. The LED light should start flashing or turn on.
- Press and release the button on your remote control or keypad. The LED light on your garage door opener should flash or go out, indicating that it has learned the new code.
- Test your remote control or keypad to see if it can open and close your garage door.
Now, let’s take a look at how these general steps apply to some of the most common garage door opener brands.
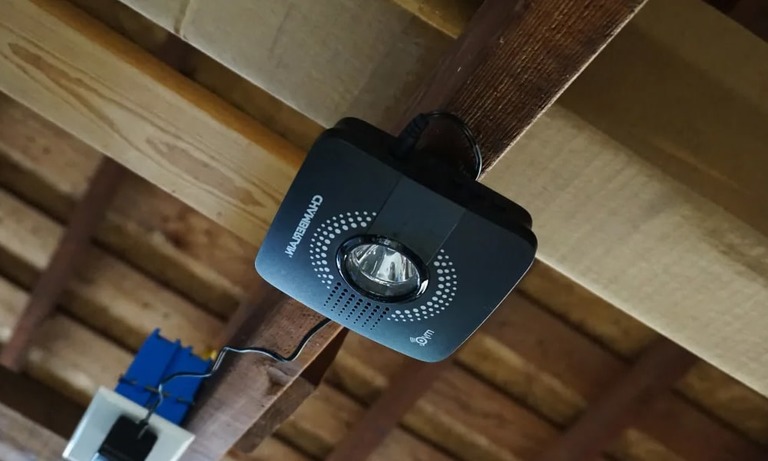
How to Reset Chamberlain Garage Door Opener
Chamberlain is a well-recognized name in the garage door industry, known for its durability and efficiency. Resetting a Chamberlain garage door opener is quite straightforward. However, the steps can slightly vary depending on the model you have. Here are the general steps:
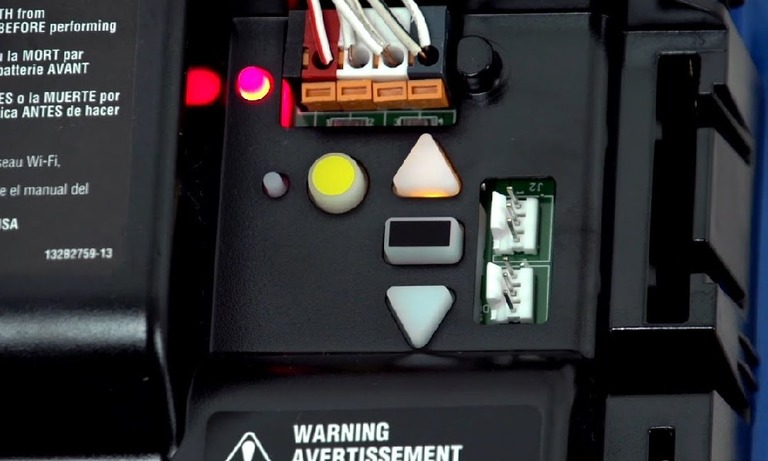
- Locate the ‘Learn’ button on your Chamberlain garage door opener. It’s typically found on the back or side of the motor unit. It can be yellow, red/orange, green, or purple, depending on your model.
- Press and hold the ‘Learn’ button for about 6 seconds until the LED light next to it goes out. This action clears the opener’s memory, erasing all previous codes.
- To reprogram your garage door opener, press and release the ‘Learn’ button again. The LED light should start to blink.
- Within 30 seconds of pressing the ‘Learn’ button, press and hold the button on your remote control. Release the button when the motor unit’s light blinks. It confirms that the new code has been accepted.
- Test the remote to see if the garage door opens and closes. If it doesn’t work, repeat the steps.
- To program more remotes, follow steps 3 to 5 for each remote.
Remember, when resetting and reprogramming your Chamberlain garage door opener, safety is paramount. Make sure the garage door is closed to prevent any accidental injuries or damage.
How to Reset LiftMaster Garage Door Opener
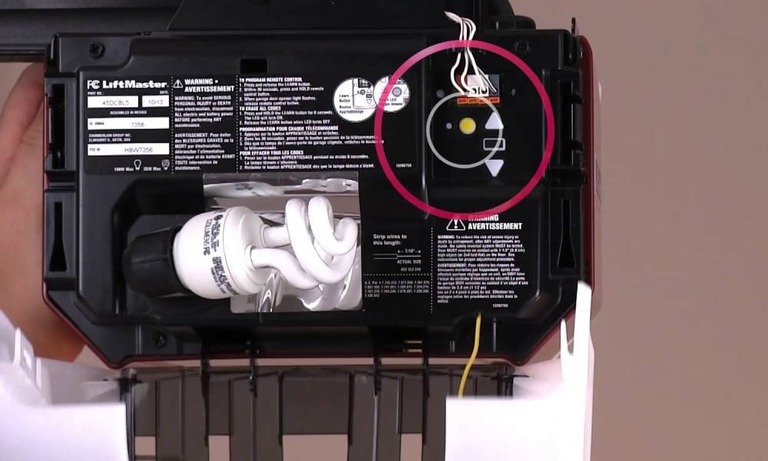
LiftMaster garage door openers are highly regarded for their quality and innovative features. If you need to reset your LiftMaster garage door opener, follow these steps:
- Locate the ‘Learn’ button on your LiftMaster opener. This button is usually on the back or side of the machine, and its color can be red, green, yellow, or purple.
- Press and hold the ‘Learn’ button for approximately 6 seconds until the LED light next to it turns off. This action deletes all previously programmed codes from the opener’s memory.
- To reprogram your garage door opener, press and release the ‘Learn’ button again. The LED light will start to blink.
- Within 30 seconds, press and hold the desired button on your remote control until the opener’s lights flash or you hear two clicks. Then, release the button.
- Test the remote control by pressing the programmed button. The garage door should open and close.
- If you have more remotes or keypads, repeat steps 3-5 for each device.
As with any other maintenance task, safety should be your top priority when resetting your LiftMaster garage door opener.
How to Reset Genie Garage Door Opener

Genie is another top-rated brand in the garage door industry, boasting of various garage door openers designed with advanced features for maximum convenience and security. Here are the steps to reset your Genie garage door opener:
- Locate the ‘Learn’ or ‘Program Set’ button on your Genie garage door opener. The button is typically under the light cover or on the rear panel of the opener.
- Press and hold the ‘Learn’ or ‘Program Set’ button for about 10 seconds until the indicator light turns off. This action will erase all programmed codes.
- To reprogram, press and release the ‘Learn’ or ‘Program Set’ button. The indicator light will flash twice per second.
- Press the button on your remote control that you wish to use for opening and closing your garage door. The indicator light will flash once and go out.
- Test the remote control to see if the garage door responds appropriately. If not, repeat the steps.
- Repeat steps 3-5 for any additional remotes or keypads.
Safety is essential when resetting your Genie garage door opener. Ensure your garage door is closed, and there are no obstructions during the process.
How to Reset MyQ Garage Door Opener
MyQ is a smart technology developed by Chamberlain, enabling users to control their garage doors using a smartphone. If you have a MyQ-enabled garage door opener and need to reset it, here’s how:
- Locate the ‘Learn’ button on your MyQ garage door opener. The button is generally found on the opener’s motor unit.
- Press and hold the ‘Learn’ button until the indicator light turns off. This action clears the opener’s memory.
- To reprogram, press and release the ‘Learn’ button. The indicator light should start to blink.
- Press the desired button on your remote control within 30 seconds. The opener’s lights should flash, indicating successful reprogramming.
- Test your remote control to ensure it operates the garage door.
- Repeat steps 3-5 for additional remotes or keypads.
Safety precautions are paramount when resetting your MyQ garage door opener. Ensure the garage door is closed during the resetting process to prevent any accidents.
How to Reset Craftsman Garage Door Opener
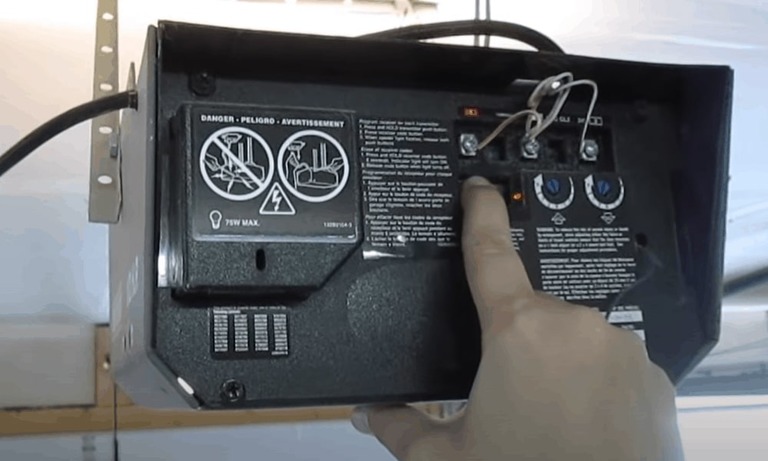
Craftsman garage door openers are known for their reliability and longevity. Resetting a Craftsman garage door opener involves a few steps:
- Locate the ‘Learn’ button on your Craftsman garage door opener. This button is usually found on the motor unit.
- Press and hold the ‘Learn’ button for approximately 6 seconds until the LED light turns off. This step clears all the programmed codes from the opener’s memory.
- Press and release the ‘Learn’ button again to reprogram. The LED light should start to blink.
- Press the button on your remote control within 30 seconds. The opener’s light should flash, indicating that the new code has been accepted.
- Test the remote control to confirm if the garage door responds correctly.
- For additional remotes or keypads, repeat steps 3-5 for each device.
Remember to prioritize safety when resetting your Craftsman garage door opener. Make sure the garage door is closed and clear of obstructions.
Changing the Code on Your Garage Door Opener
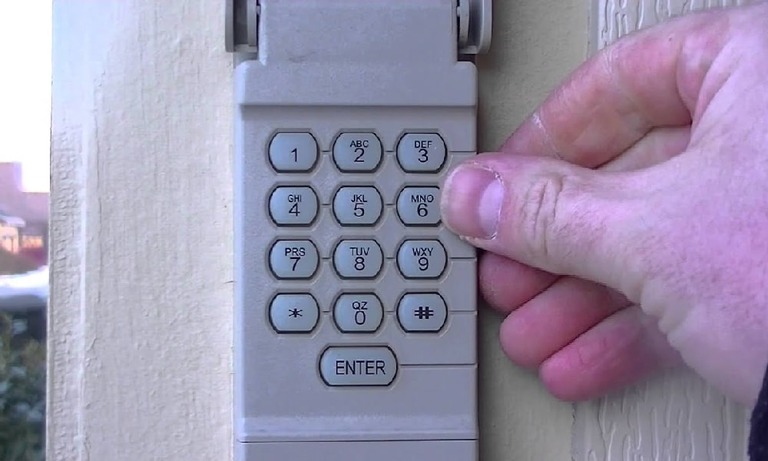
Changing the code on your garage door opener is a great way to maintain your home’s security, especially if you’ve shared your code with others in the past. Most garage door openers follow a similar process for code changing:
- Locate the ‘Learn’ button on your garage door opener. The button’s location and color may vary based on the model and manufacturer.
- Press and hold the ‘Learn’ button for about 6 seconds until the indicator light turns off, erasing all previously programmed codes.
- Press and release the ‘Learn’ button to enter the programming mode. The indicator light will start to blink.
- Enter your new code on the keypad or remote control within 30 seconds. The garage door opener’s light should flash, indicating the acceptance of the new code.
- Test the new code to ensure the garage door responds correctly.
- Repeat the process for each remote control or keypad.
Safety should always be your top priority when changing the code on your garage door opener. Always ensure that the garage door is closed to prevent any accidents or injuries.
Conclusion: The Importance of Knowing How to Reset Your Garage Door Opener
Resetting your garage door opener may seem like a daunting task initially, but with the right instructions and a bit of patience, you can effortlessly achieve it. Regardless of the brand – Chamberlain, LiftMaster, Genie, MyQ, or Craftsman, the steps are largely similar, involving locating the ‘Learn’ button, erasing old codes, and programming new ones. Changing the code on your garage door opener is also an excellent practice for maintaining home security and ensuring only authorized access.
Remember, while carrying out these steps, safety is paramount. Always ensure the garage door is closed and clear of any obstructions to prevent accidents or injuries. Regularly testing your garage door opener is also essential to ensure it is functioning correctly and respond promptly to any glitches.
Moreover, it’s important to remember that while these steps can help you troubleshoot basic issues, some situations might require professional help. If your garage door opener continues to malfunction after a reset, or if you’re uncomfortable performing these steps, don’t hesitate to contact a professional.
Garage door openers are designed to provide convenience and security, and understanding how to reset them is a valuable skill. Keep this guide handy, and you’ll always be prepared to handle garage door opener resets with ease. Whether you’re dealing with a brand new model or an older unit, these steps will help you maintain your garage door opener and ensure it’s operating smoothly, keeping your home safe and secure at all times.