Start with the closing pattern: no movement, reversal during travel, or a stop at the floor. Keep clear of a crooked or damaged door; do not bypass sensors or increase force to make it close.
Start with what the door does, follow the right diagnostic branch, and know when a simple observation becomes a job for a technician.
Separate the closing pattern, sensor indication and visible door condition before choosing the next check.
Start here: look before you operate
The door opens normally. You back the car out, press the remote and watch it start down—only to climb back up. Or it refuses to move at all. Both get described as “my garage door won’t close,” but they are not the same fault. The point where closing fails tells you where to look first.
A motor that raises the door may be correctly refusing an unsafe closing command. A reversal near the floor suggests a different investigation from a door that never starts. A remote that does nothing while the wall control works points toward a third path. Follow the branch that matches what you have already observed.
Step 1 Decide whether it is safe to continue
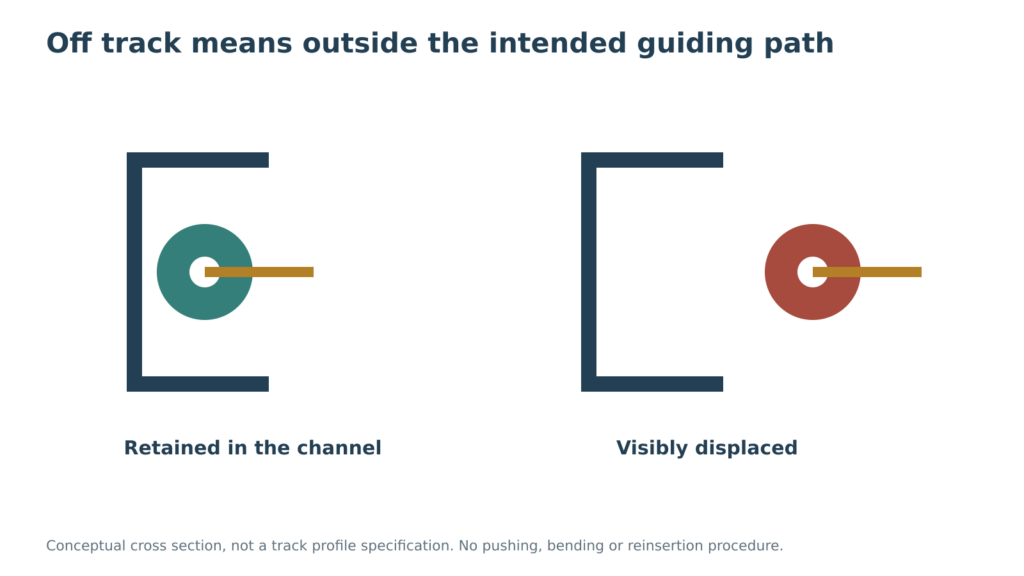
Begin without operating the door. From a clear position beside the opening, look for a markedly tilted bottom edge, a hanging cable, a roller outside its track or a visibly separated spring. A door that has dropped or moved violently also belongs in the stop-use category. You are looking, not touching parts to test them.
An intact appearance does not prove that the system is safe. It simply means you have not found an obvious reason to stop at this first gate. If you are uncertain about visible damage, arrange an inspection rather than trying another cycle.
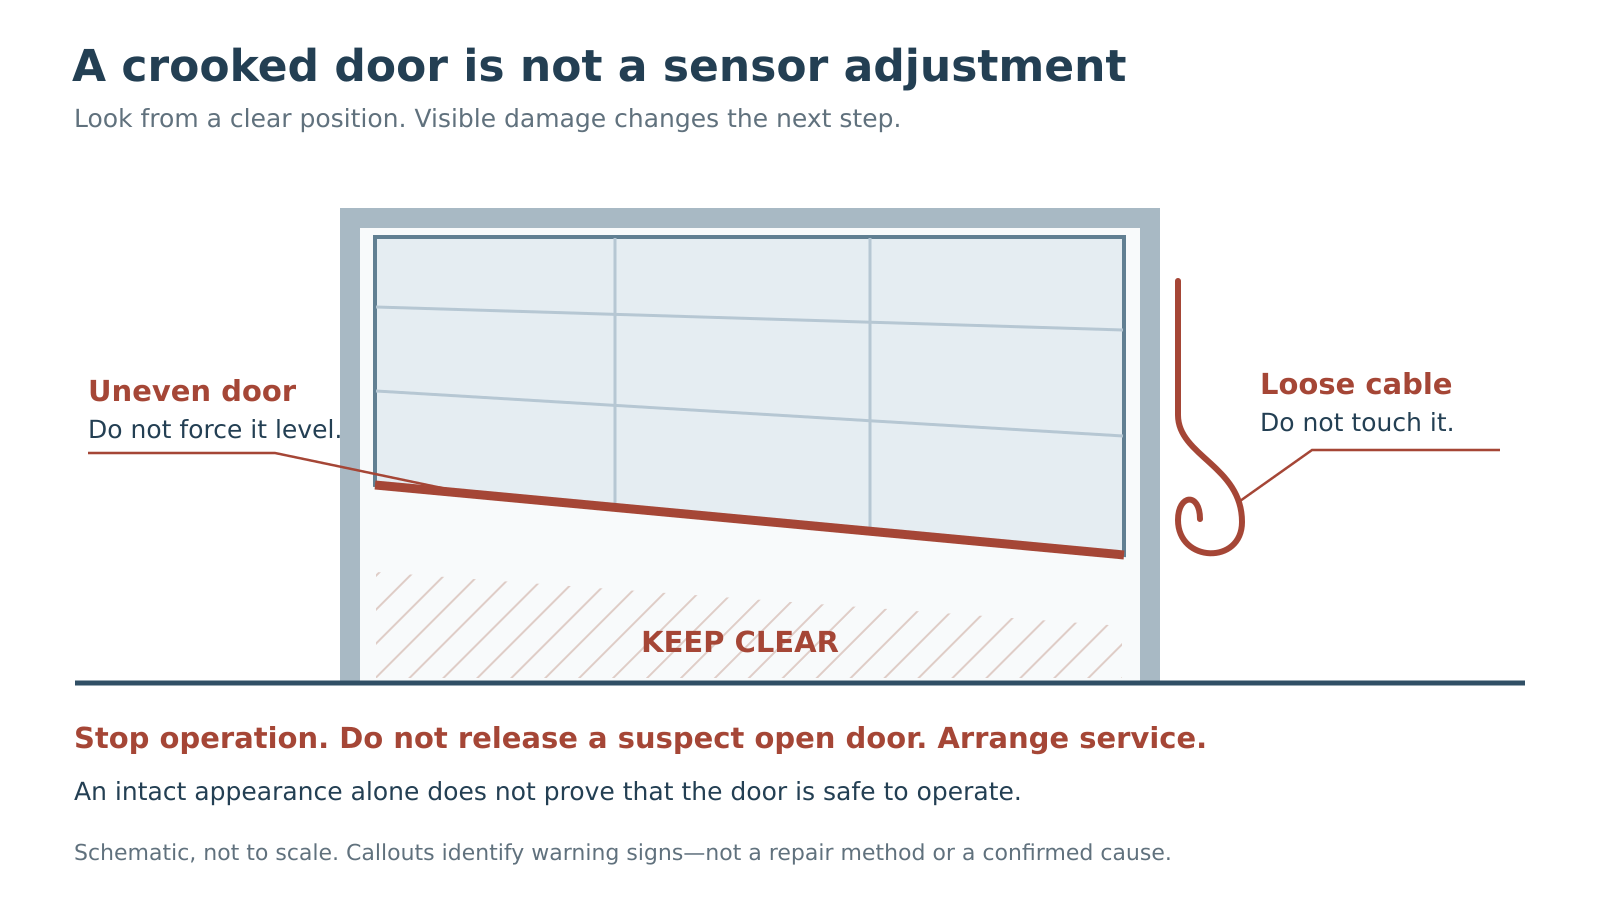 Select the diagram to view it at full size.
Where to go next. Visible damage or dangerous movement: stop here and arrange service. Otherwise, continue using observations from the last ordinary closing attempt.
Step 2 Find your branch: no start, mid-travel or at the floor
Did the door refuse to start, reverse before reaching the floor, or touch down and come back up? The diagram separates those patterns. Do not reproduce a failure to fill in a missing detail; an unobserved symptom is better than another unsafe cycle.
The photoelectric sensors send a low beam across the opening. An interrupted beam can stop or reverse closing before anything touches the door. Contact reversal is different: it concerns the descending door meeting an obstruction. Steady sensor lights therefore do not establish that the door moves freely or that contact reversal works.
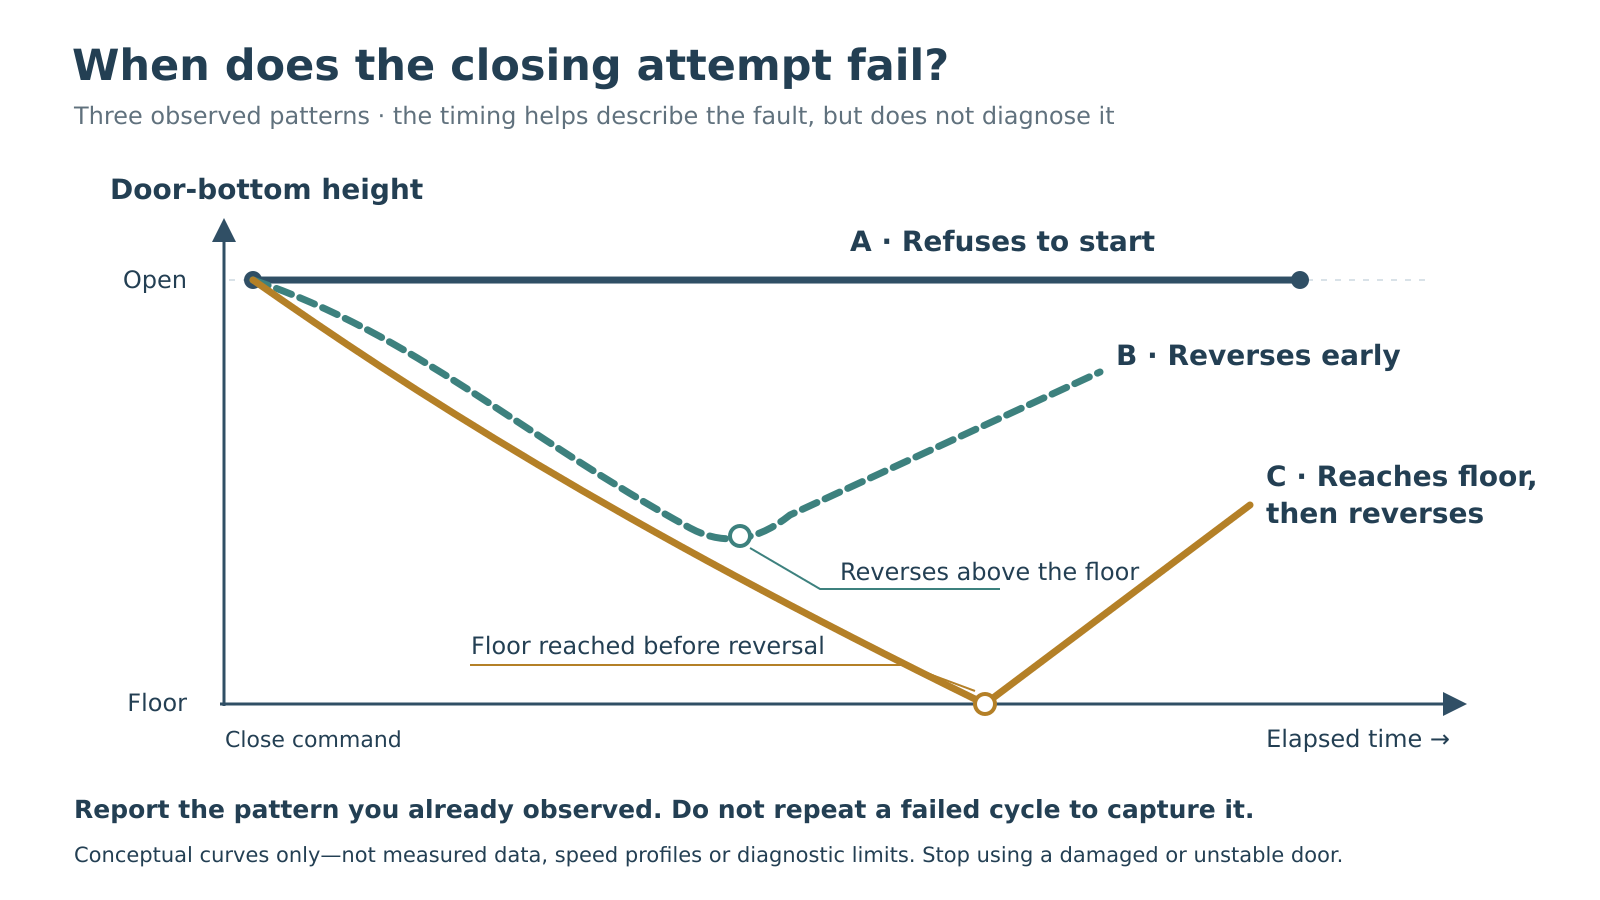 Select the diagram to view it at full size.
Where to go next. No start or an immediate reversal: go to Step 3. Reversal during travel: read Step 3, then Step 4. A consistent gap or rebound at the floor: go to Step 5. If only one control fails, use Step 6.
Step 3 Check the low beam path, then read the sensor lights
For a garage door that opens but won’t close, visually check the whole low strip between the sensors. A broom, box or leaf can interrupt the beam while the upper doorway looks clear. Move loose clutter only if it is safely reachable without getting beneath an unstable door or near moving hardware.
Inspect the lenses for dirt or cobwebs; clean gently as the equipment instructions allow. Do not push on the track to aim a sensor. A displaced or unstable mount needs a different response from a dirty lens. Our sensor-alignment guide explains that distinction.
In Chamberlain/LiftMaster’s alignment guide, amber identifies the sending sensor and green the receiver: the colors are not supposed to match. The beam must be no higher than 6 inches (15 cm) above the floor. Measure to the beam—not to the top of the housing or a convenient position above clutter.[2]
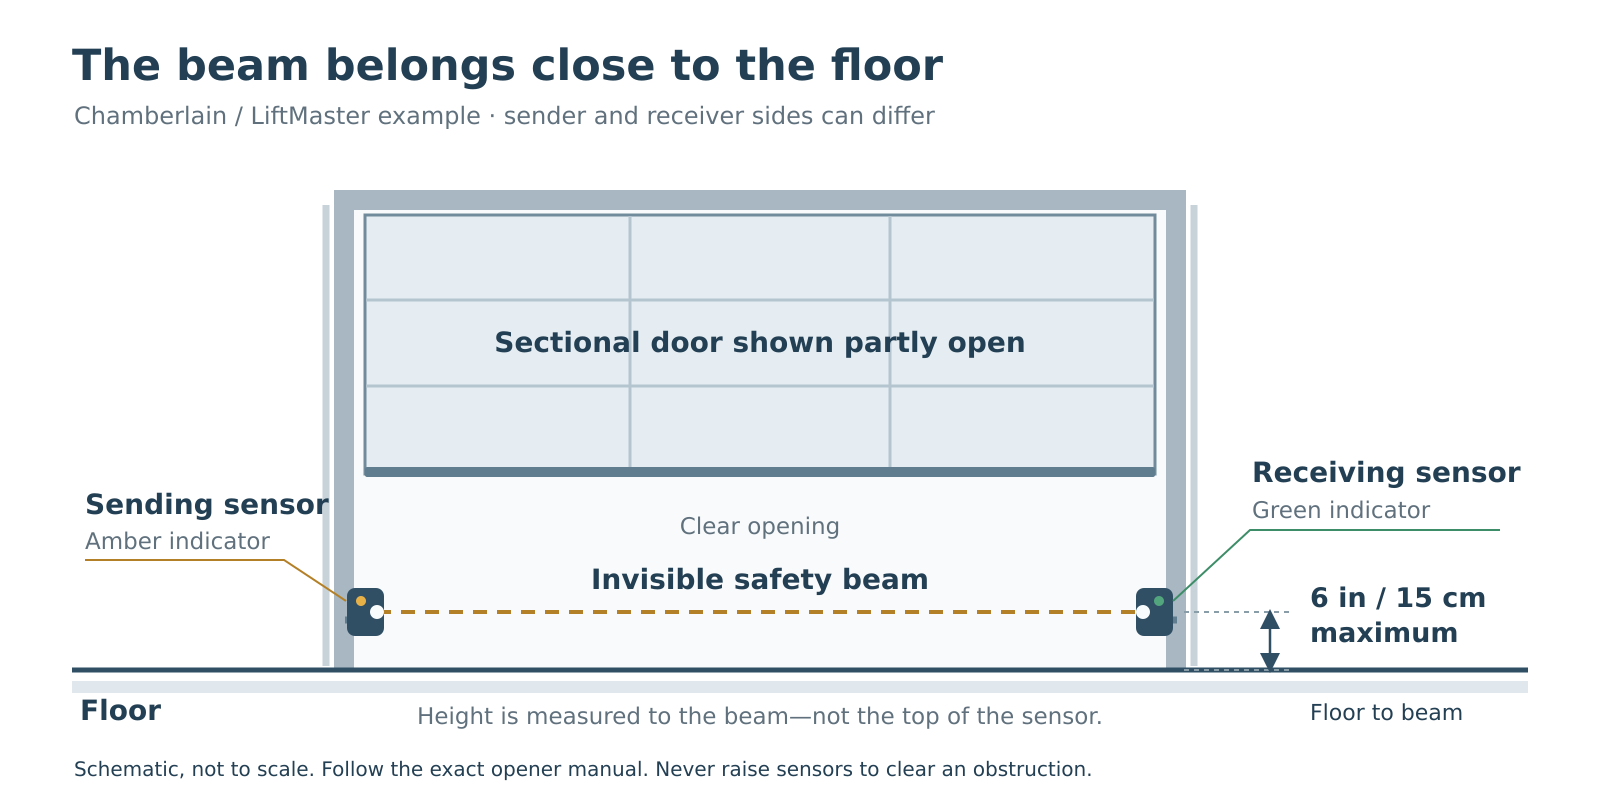 Select the diagram to view it at full size.
For sensor model 041-0136, blinking green points toward obstruction or misalignment. Amber on with green off points toward receiving-sensor wiring. Record which light changes and whether it blinks or goes completely dark; these observations are not interchangeable reasons to replace the sensors.[2]
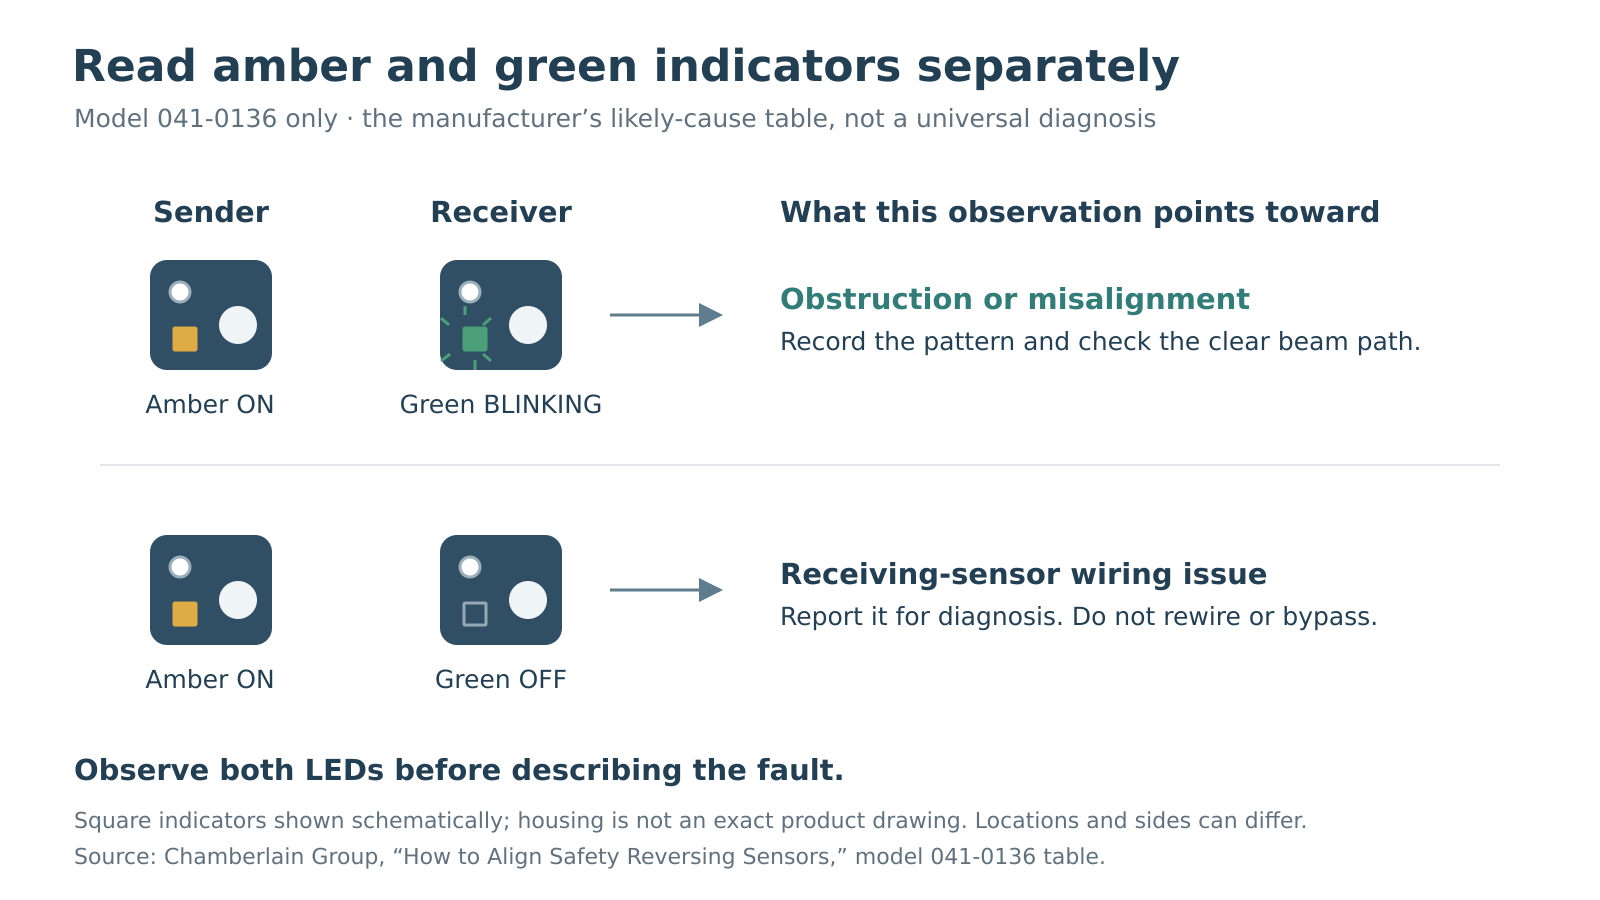 Select the diagram to view it at full size.
One exception matters: the LiftMaster 8365W/8365W-267 manual describes a sleep mode that turns sensor LEDs off when the door is fully closed. Dark lights on that closed system are not the same evidence as dark lights during a failed closing attempt.[3]
Look at the two indicators as a pair, not as a pass/fail sticker. A steady receiver before movement does not tell you whether an object later crosses the beam. Likewise, the 041-0136 distinction is useful only after identifying that sensor; other generations need their own instructions. If you cannot safely identify the model, send a clear photograph to the service provider instead of assuming that the colors establish the diagnosis.
Where to go next. After removing a definite loose obstruction, and only with an intact-looking door and clear opening, observe one ordinary closing command from a safe position. If it fails, stop repeating the cycle and record the LEDs. Permitted alignment follows the exact manual; suspected wiring faults go to service.
Step 4 If it reverses in motion, connect the timing to the cause
When a garage door goes down then back up, ask what changed during travel. A hanging object can enter the beam only as the panels descend. The 8365W/8365W-267 manual includes momentary beam obstruction under code 4-6; this is a model-scoped example, not a universal code definition.[3]
A repeatable failure position can also indicate resistance. New scraping, uneven movement or sideways shifting is not solved by another command. A technician can evaluate door movement and counterbalance separately from the opener, rather than treating every reversal as an electronic failure.
Do not indiscriminately lubricate the tracks: lubricant cannot straighten a bent track or restore a displaced component. Record the location of resistance and any visible damage instead.
Timing offers another clue. If closing fails in direct afternoon sun but works later, the receiving sensor may be affected. Chamberlain documents sunlight interference with its green receiving eye.[4] Report that pattern; it does not prove motor damage. Any remedy must preserve the required beam position and function.

Where to go next. Safely reachable loose clutter can be removed. Do not alter door attachments. Scraping or uneven movement calls for inspection; a sunlight-only pattern belongs with sensor diagnosis.
Step 5 Separate a short stop from contact with the floor
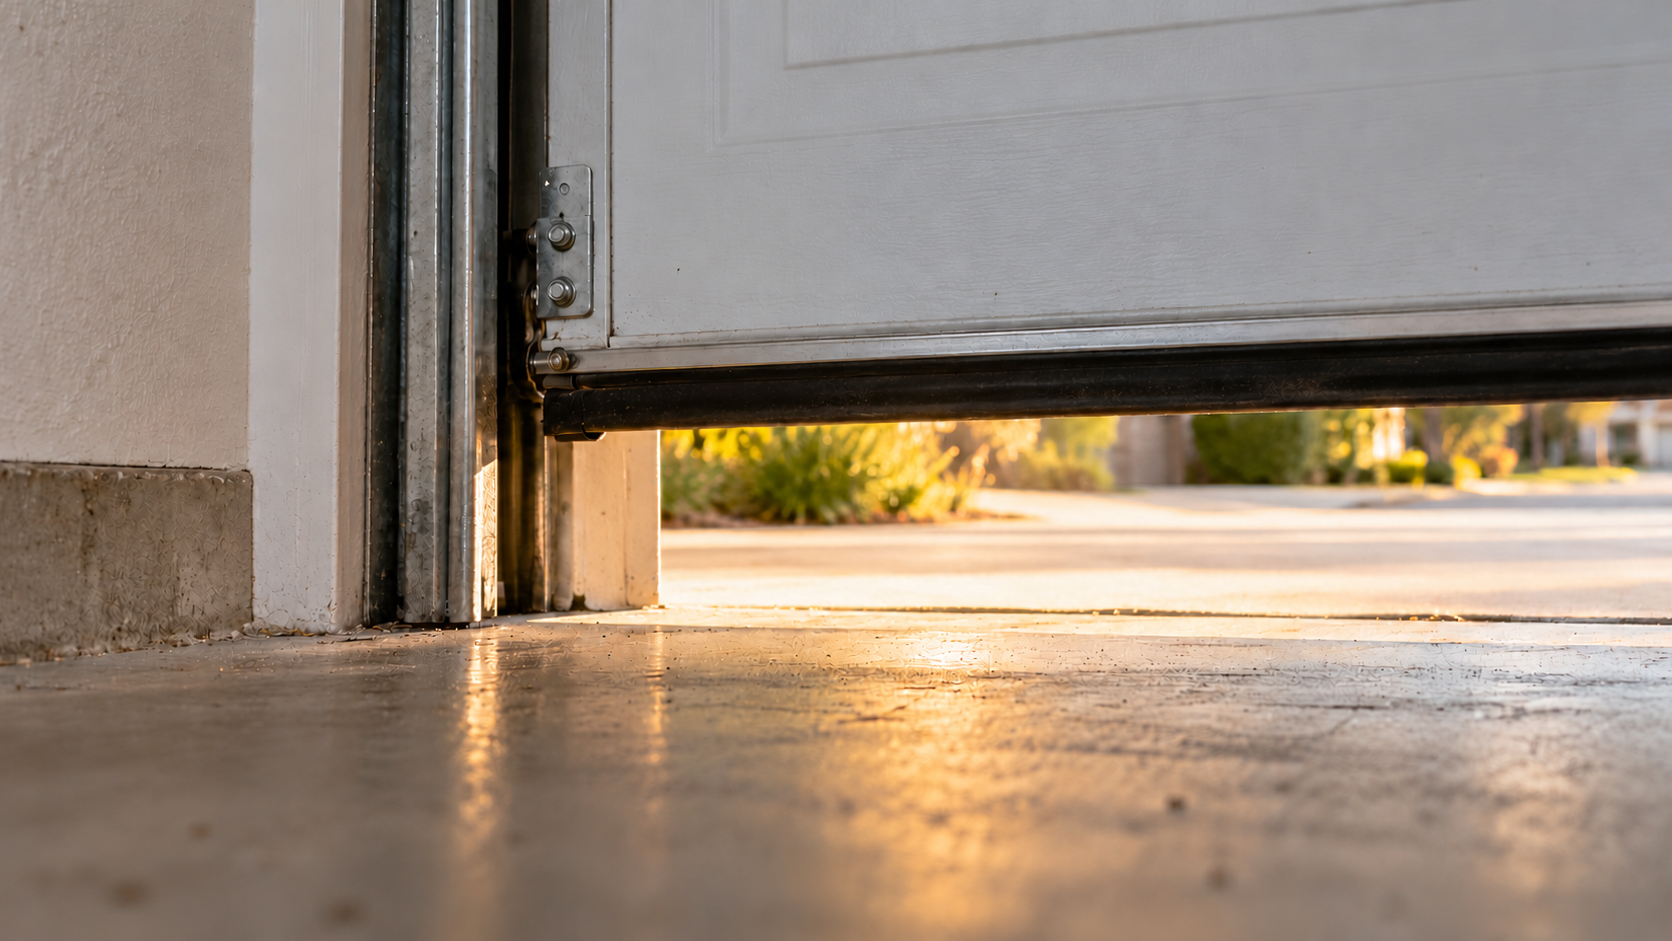
A gap at the bottom is a symptom, not a setting to adjust blindly. Separate a smooth stop above the floor from a door that reaches the floor, compresses the seal and reverses. Both leave the garage open, but they describe different events.
For a short stop, note whether it happens smoothly at the same height or follows rubbing and jerking. For a rebound, note the contact point and recent changes: new weatherstripping, threshold debris or work on the door. That history is a clue, not proof of the cause.
Travel programming defines the stopping positions. If the floor is reached before the expected closing movement ends, the setup needs assessment alongside the physical door. Correcting an endpoint is different from overpowering resistance.
Avoid advice to turn a “down-limit” screw a fixed amount. Some openers use mechanical controls; others use electronic travel and learned force. Even within one brand, procedures differ. The outcome should be smooth, properly limited movement with safety systems verified afterward.[1]
A photo of the gap, taken from outside the travel path, may be more useful than another cycle. If the problem followed an impact or repair, include that detail when requesting service.
Step 6 Read the correct indicator and compare the controls
First identify the display: main work light, Learn-button LED, UP/DOWN arrows or floor-sensor indicator. They do not share one diagnostic language.
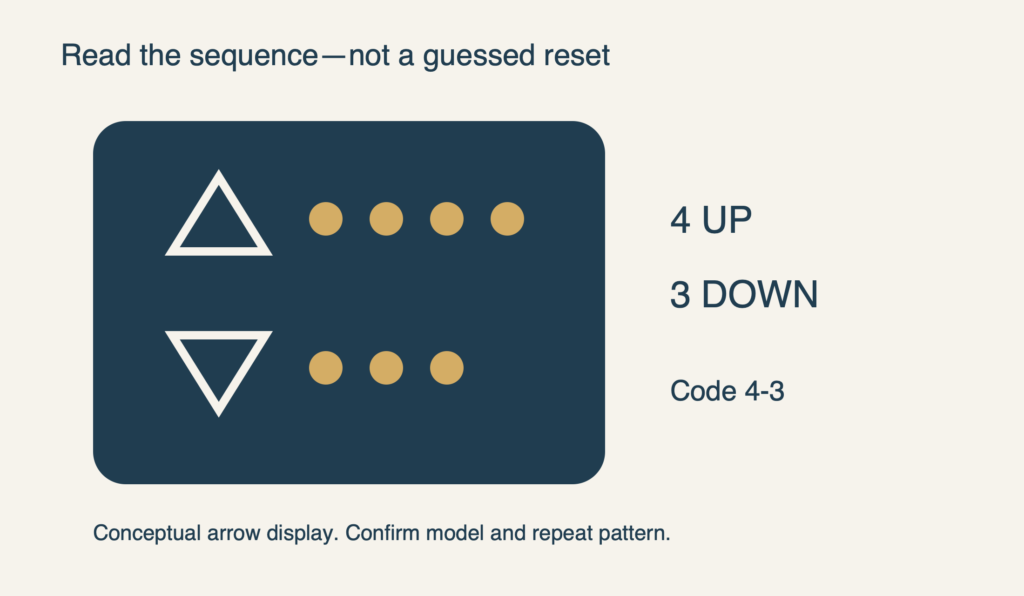
On an arrow-equipped opener covered by Chamberlain’s guide, record UP and DOWN counts separately. One UP then one DOWN is a two-part code, not “two flashes.” Capture the model label only if safely accessible, without opening electrical covers. A code narrows the investigation; it does not automatically identify a failed part.[5]
Older videos may promise ten main-light flashes when sensors prevent closing. Chamberlain says that indication was removed from openers and replacement boards manufactured after February 3, 2022. No ten-flash warning does not rule out a sensor fault; the board’s generation matters too.[6]
Compare controls using behavior already observed. If the wall control closes normally but the remote does nothing, the remote battery, compatibility or supported lock mode may be relevant. If only the phone app fails, consider the connected-control system. Avoid resetting everything before recording what works.
A door that closes only while someone holds the wall button is a different result from ordinary operation. Report it if already observed; do not try it as a test or workaround. It can accompany an unresolved sensor problem, not demonstrate a repaired safety system.
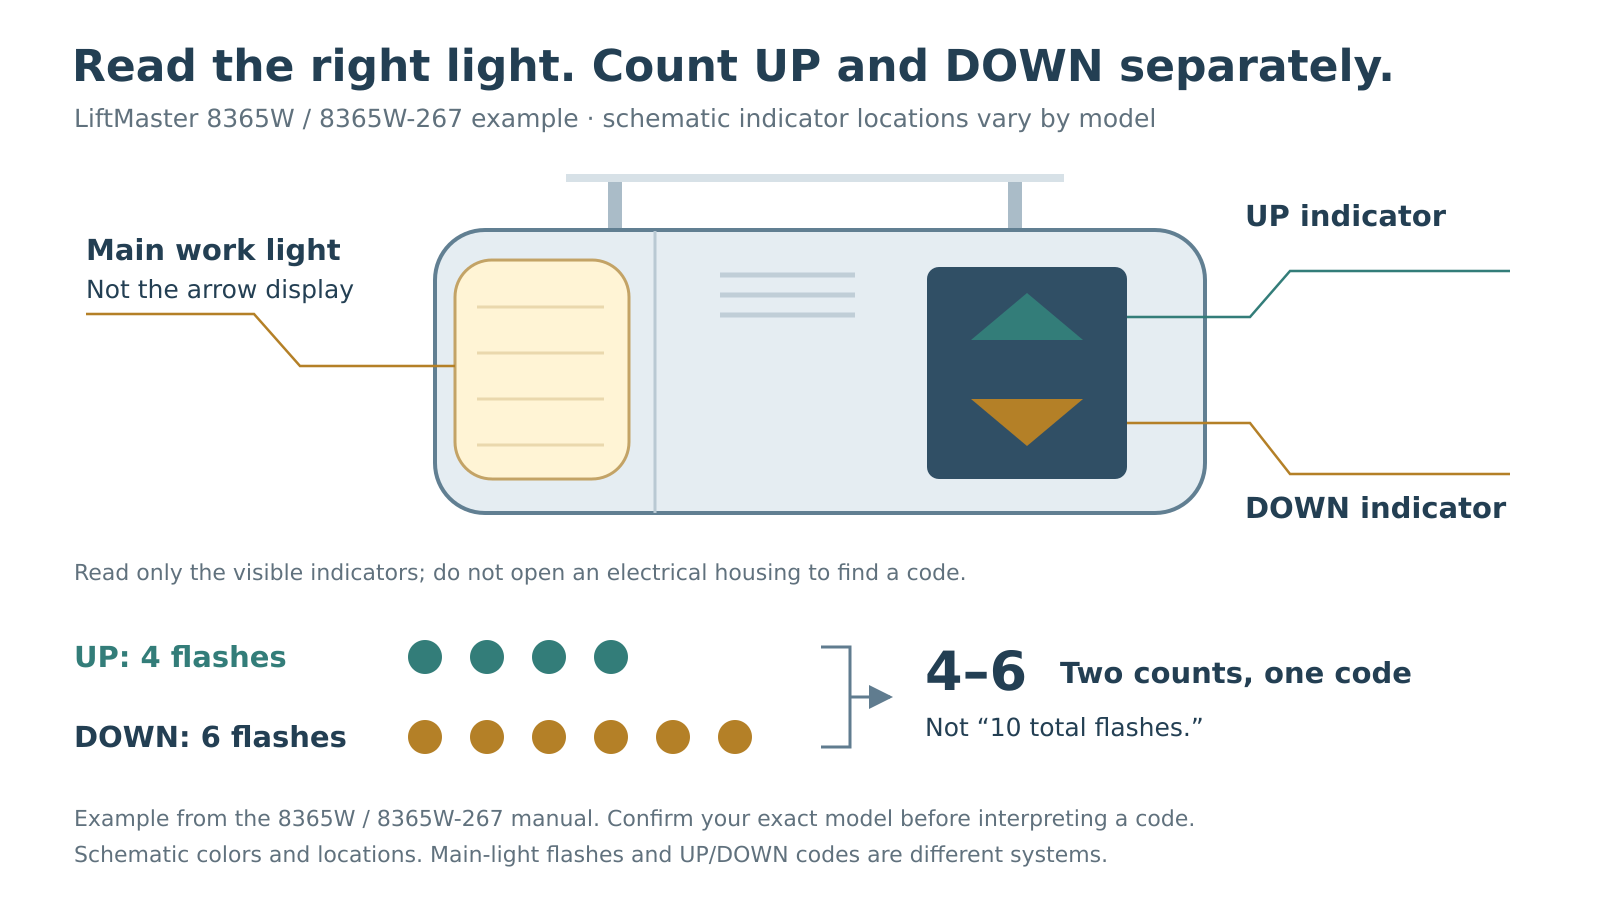 Select the diagram to view it at full size.
Where to go next. Remote-only failure: consult its battery and lock-mode instructions. App-only failure: follow connected-control troubleshooting. Failure from every ordinary control: return to the door/sensor branch, not an app reset.
Step 7 Confirm the result—not just one successful closing
A complete repair addresses the original symptom, restores ordinary controls and includes manufacturer safety verification. An intermittent problem needs an explanation for its timing or position—not just one successful closing while someone watches.
Only after safe ordinary movement is restored, follow the exact model’s complete safety-test procedure. For example, the 8365W/8365W-267 manual specifies a contact-reversal test with a 1½-inch (3.8 cm) board or nominal 2×4 laid flat. The door must reverse on contact; testing is required monthly and after adjustments.[3] Never use a hand, foot or person as the test object.
Describe the sequence when requesting service: “It opens normally, starts down, then reverses halfway. The receiving sensor flickers there. The problem began after storage moved beside the track.” This example records what works, where it fails and what changed—more useful than “the opener is broken.”
For an unresolved control or sensor fault, garage door opener repair is the appropriate starting point. Visible track damage or uneven travel belongs in the request for door and track assessment. Local Garage Experts takes calls daily from 6 a.m. to 11 p.m. at (323) 924-8777, with free estimates, free diagnostics and no service call fee.
The aim is not to make the opener try harder. It is to separate an interrupted beam, a control fault and resistance in the moving door, so the eventual repair addresses the right cause.
Sources & manuals
Model-specific examples are not universal instructions.